
So, have you had a chance to read Chapter 1 on recommended mics and Chapter 2 on recommended audio interfaces? I've heard from people who bought the gear I recommended, and I hope you're happy with it given the price. If you weren't, I'm sorry.
This chapter covers "recording tips" for home recording that you might not know about. I'll skip over things like "how to operate your gear's recording and editing features" or "how to upload to a site or blog," since those are outside the scope here.
Start by Reviewing Your Recording Environment
Since you're recording at home, you need to pay maximum attention to ambient noise around you. Condenser mics in particular are sensitive enough to pick up a lot of surrounding sound, so your recording environment really matters.
Is Your Recording Spot Actually OK?
Houses facing a main road, or wooden apartment buildings, honestly aren't great for home recording. Car noise, footsteps, and voices can all creep in. If there's a real chance of unexpected noise, it's safer to just record at a rehearsal studio instead. If a baby starts crying in the middle of a great take, you'll want to cry too.
Watch Out for Air Conditioning
You're generally better off turning the air conditioner off while recording. Unless the room is unusually large, the sound will get picked up easily. This is especially true with condenser mics, which really do pick up everything. Summer is rough without AC, though... if the heat gets unbearable, it might be worth considering a rehearsal studio instead.
Keep Noise Sources as Far from the Mic as Possible
The most obvious culprit nearby is probably your desktop PC. It's presumably powered on, and fan noise is very likely to get picked up, so move the tower as far from the mic as you reasonably can. That alone reduces noise. If you can, using a fanless graphics card and swapping other fans for quiet ones will help even more. It's a trade-off between budget and effort, but it's worth doing what you can to quiet down your PC.
Laptops are usually less of an issue, but many still have fans, so keeping some distance from the mic doesn't hurt.
If you're recording a song, a bit of noise tends to disappear once it's mixed with the backing track, so you don't need to be overly nervous about it. Of course, the closer to silence the better, but focusing on your performance gets you a better take than obsessing over minor noise.
Less Reverb Is Better
It's also important to record in as dry, non-reverberant a space as possible. Reverb that seems fine while recording can become a real headache later during editing and mixing. Unless you're deliberately going for a reverberant sound, it's usually better to aim for something dry. Effects can add all kinds of ambience afterward easily, but it's hard to naturally remove reverb that's already baked into a recording.
If reverb is a serious problem, sticking sound-absorbing material where your voice hits the wall, or building a curtained-off space to record inside, can help a lot. There are plenty of other approaches too, but if that all sounds like too much trouble, renting a studio is by far the quickest fix.
Also, since you're presumably going to keep doing home recording going forward, I'd really recommend looking into a reflection filter.
Consider a Reflection Filter
This series is about keeping costs as low as possible, but if you have a bit of budget, a reflection filter is worth buying.
It cuts down reverb effectively with very little effort. And it looks pretty cool too, which doesn't hurt the motivation!
Recommended Reflection Filters
CLASSIC PRO CAR900 Reflection Filter
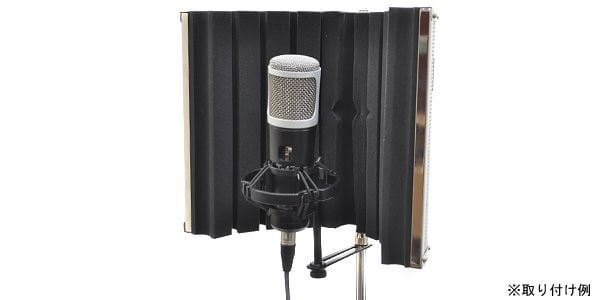
※Click the image to view the product.
Unbeatable value. You can get a reflection filter for a little over ¥5,000 including tax.
It does weigh about 2kg, though, so handle it carefully.
It mounts directly on top of a mic stand, so as long as your mic isn't too heavy, it should sit stably.
https://www.youtube.com/watch?v=59fEJlG7ZLw&feature=emb_title
sE ELECTRONICS "RF-X"

reasonably priced, and it really does cut down reflections well.
I think it's a solid choice as your first reflection filter.
Things to Check Before You Start Recording
Air conditioning, your PC, and reverb — for home recording, keep these three in mind. Cut as much ambient sound as you can. Oh, and watch out for your phone too! Notification sounds and vibration are easy to forget about, but they will ruin a take.
If your home phone rings or the doorbell chimes, just give up on that take. If landline calls or the doorbell go off often in your place, it's safer to unplug the phone jack for the session, though of course you might be waiting on an important call, so it's a judgment call.
Time to Get Ready to Record
You don't strictly need one with a dynamic mic, but if you're recording with a condenser mic, please use a pop filter. As mentioned in the mic chapter, this is to prevent plosive noise. Try holding your palm in front of your mouth and saying a hard "P" sound loudly — you'll feel quite a bit of air hit your hand. A pop filter cuts down how much of that air reaches the mic during recording.
Checking the Mic
First, check that your mic is working. A word of caution here: you may have seen people tap the head of a mic to test it, at assemblies or receptions — please don't do that. Always test by speaking, saying something like "ah, ah" instead. Tapping the mic risks damaging the equipment, and if you tried it at a live venue, the sound engineer would definitely yell at you.
Setting Your Recording Level
Next is setting your recording level. Unlike analog recording, digital recording clips (exceeds 0dB) and simply can't capture anything louder than that — the waveform above the ceiling just gets cut off, causing distortion. You generally want to record as loud as reasonably possible, but if that makes you too anxious to focus on your performance, you're defeating the purpose. As long as it's not extremely quiet, you can always raise the volume later, so peaking around -3dB to -6dB on vocals is perfectly fine. Even quieter than that is okay too.
Is Recording with Effects Applied Live Actually Safe?
You can record through a hardware or software compressor live if you want, but unless you're deliberately going for a specific effect, I'd keep it light. Applying it carelessly rarely helps, and a bad setting can actively work against you. If you don't understand threshold, ratio, attack, and release, skip the compressor and just record dry. As long as you watch your noise floor and peaks, you'll be fine, and for vocals, trust that mixing afterward can take care of the rest.
Now for the Actual Take
Once you're set up, it's finally time to record — but at this point, it really comes down to your own skill. I'm no vocalist myself, so I can't give technique advice here; instead, let me say a few things about the mental side of it.
Even with nobody else around, it's easy to get nervous or tense up once you're actually recording. Recording sessions you're not used to tend to bring on nerves, frustration, self-criticism, and so on — it's easy to fall into that kind of negative spiral.
"Why can't I get this take right?" "I usually sing this so much better!"
Honestly, that only gets better with practice. But here's the thing — nobody else is watching, and you can redo the take as many times as you have time for. That's exactly the advantage of home recording. You don't have to finish in one day, so don't push yourself too hard — take breaks, and record until you're satisfied.
So, about the actual take: the recording level mentioned earlier matters here too. Speak or sing clearly and at good volume, and set your levels accordingly. If your voice is quiet and your recording level is turned up to compensate, the noise gets louder too. Actually vocalize at the loudest point of your line or song into the mic to check the level, and once again, make sure you never exceed 0dB.
Dynamic mics want on-mic technique (mouth close to the mic), while condenser mics want off-mic technique (roughly 20-30cm away) — that's fine as a baseline. The angle of the mic also changes your results a lot. Mics have what's called directionality. Most common mics are cardioid (unidirectional), meaning they're most sensitive to sound arriving from the front. With a cardioid mic, make sure you're speaking directly into the front of it.
That's about the minimum you need to know for recording. Beyond that, the skills that matter depend on the genre — drama CDs, narration, singing, and so on — so needless to say, daily practice is what really counts.
Home Recording Tips, Wrapped Up
Once your environment, location, and setup are all in place, all that's left is to record, record, record. This isn't the nicest way to put it, but especially early on, you'll have to compromise somewhere. Recording something perfectly just isn't realistic. But keep at it, and you'll start to notice yourself improving, so please give it a try! I've written a lot across Chapters 1 through 3, and I hope even a little of it was useful. Thanks for reading all the way through.
※If you ever need editing or mixing done on a recording, feel free to reach out any time. You can contact us through Commission Request.
※Bonus: Considering a Simple Soundproof Booth
Sakashita Nanaka, who publishes free voice material on this site, bought a "Danbocchi" soundproof booth, modified it twice, and built a genuinely great recording environment — and wrote up the whole story as a column.
If that sounds interesting, please give it a read. If you record your own voice at home, whether singing or narration, I think you'll find it worth your time.
The story of why I chose a Danbocchi booth as a simple soundproof room for home recording, to work as an online voice actor.