
In Chapter 1, I talked about why I chose a Danbocchi booth as a simple soundproof room for home recording, to work as an online voice actor.
In Chapter 2, here's the write-up of the first round of modifications I made to the used Danbocchi booth I bought.
What I Prepared Before Modifying the Danbocchi
- Used Danbocchi + sound-absorbing material (¥70,000)
- Bond tape, 15mm wide × 10m (¥800)
- Bond tape, 30mm wide × 10m (¥2,700)
- Double-sided butyl tape (¥1,000) × 2
- Super-strong double-sided tape (¥720)
- Double-sided tape (¥100)
- PTFE-coated scissors (¥260)
- Something to use as a cutting mat with a utility knife (¥100)
- Daiken sound-blocking sheet, 940mm × 10m, 1 roll (¥3,600)
- Furniture sliders from a ¥100 shop, 6 pieces (¥600)
- 1m bamboo ruler (had already), blue tarp (had already), thick utility knife (had already), writing supplies (had already)
※These prices are roughly what things cost at the time (treat them as reference prices only).
I gathered all of this after looking at sites from people who'd done this before me.
※My used Danbocchi came with a generous amount of sound-absorbing material included for free. I decided to use that instead.
※I went back and forth between a sound-blocking sheet and a lead sheet, but chose the sound-blocking sheet based on price and weight.
※I used bond tape to attach the sound-blocking sheet. I ended up with three different widths. I bought the narrow one to save money, but honestly, two rolls of 50mm width would have been the better call. I burned through it fast.
※I bought butyl tape to attach the sound-absorbing material. I also used it in place of bond tape to attach the sound-blocking sheet in some spots.
※I used the PTFE-coated scissors to cut the various tapes — useful if you can afford it, since regular scissors get gummed up with adhesive.
※The 1m ruler was handy for measuring the sound-blocking sheet.
Danbocchi Modification, Round 1
Removing the Factory Sound-Absorbing Material
It took two people to carry it up to the second floor on delivery. Even with two people it looked pretty heavy.
Since it was used, I assembled it once to check everything over. The condition was good.
The Danbocchi's factory sound-absorbing material was already attached, but since I wanted to swap it for what I'd prepared, I carefully peeled it off.
This part won't apply if you're buying new.
Cutting the Sound-Blocking Sheet
To attach the sound-blocking sheet to the inside of the Danbocchi, I disassembled it once.
First, I cut all the sound-blocking sheet to match the size of the Danbocchi panels.
I tried to lift the sheet up to the second floor to work there... and couldn't lift it! It's genuinely heavy.
Lead sheet is even heavier, so please be really careful lifting it if you go that route.
I ended up cutting it in the entryway instead.
I measured this part carefully to match the Danbocchi's dimensions.
The sound-blocking sheet cuts easily with scissors or a utility knife.
(cut it into separate pieces for each panel)
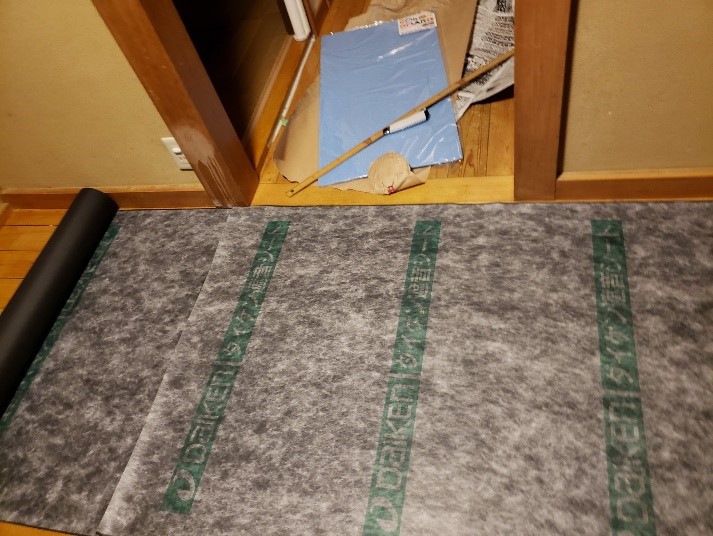
If you buy an extra roll of sound-blocking sheet and apply it to the outside of the Danbocchi too, you get a "black Danbocchi."
I thought about doing that for extra protection on the outside, but gave up once I felt how heavy the sheet was.
I saw someone online who'd wallpapered theirs nicely — I'd like to try that myself someday.
Attaching the Sound-Blocking Sheet to the Inside of the Danbocchi
You could wrap each panel in sheet with the edges folded over (cutting the sheet a bit larger and folding back the edges),
but folding the edges is a hassle, and I was worried about the extra thickness once assembled, so I cut mine to fit exactly and attached it flush.
I applied bond tape to all four corners and edges of each Danbocchi panel, plus an X shape across the middle.
Then I slowly attached the sound-blocking sheet starting from one edge (rolling it loosely as I went),
fixed the starting edge firmly in place (masking tape works well for temporarily holding it),
and then worked my way across slowly, bit by bit.
Once it's fully attached, press it down firmly. Repeat for every panel.
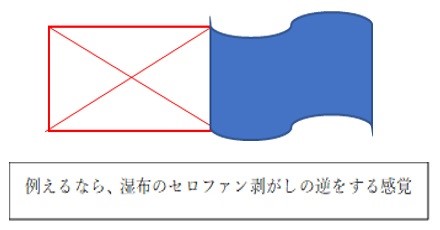
Reassembling and Attaching the Sound-Absorbing Material
I laid down the blue tarp I'd been using for the work, and assembled the Danbocchi on top of it.
I stuck the furniture sliders on the bottom (makes it easier to move around).
Once assembled, I attached the sound-absorbing material.
Sound-absorbing material tends to fall off, so I used plenty of butyl tape on the back and stuck it down firmly.
And that's it, done!
I assembled the whole thing first and attached the sound-absorbing material afterward, which made attaching the ceiling panel a real struggle in the dark.
This particular sound-absorbing material was soft, so it probably would have been fine to attach it to the ceiling panel
before final assembly. (depends on the material though)
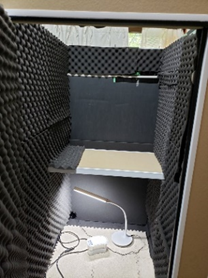

First Round of Danbocchi Modifications, Done
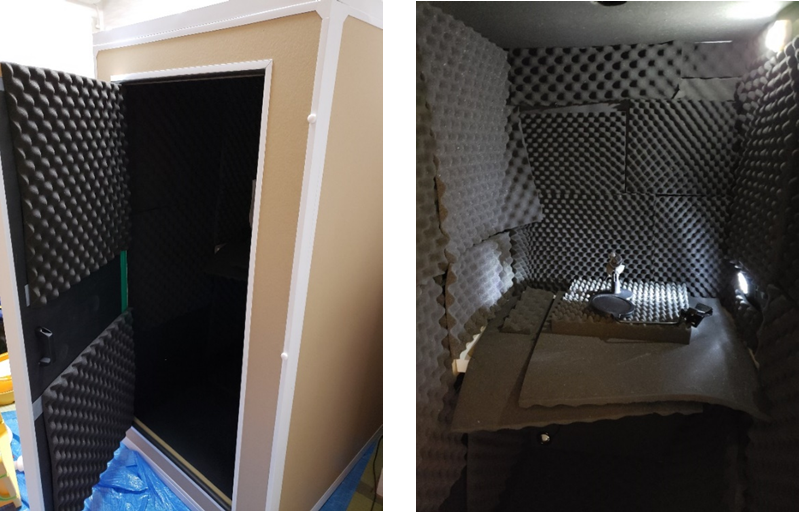
I used a variety of sound-absorbing materials, since that's what came with the booth.
I applied thicker material toward the front, where my voice hits directly, so the finish is a bit lumpy.
Honestly, the back should probably be properly covered too for better reflection control, but I think I just ran out of energy at this point.
The floor has cardboard plus sound-absorbing material laid down.
For lighting inside, I bought two battery-powered LED lights from a ¥100 shop.
I skipped fluorescent lighting since the buzzing sound bothered me.
So, here's what worked and what didn't at this stage.
What worked
Audio quality improved dramatically. (Before this, I was recording in a 6-tatami room, boxed in with homemade panels)
The door closes, so I can focus better. Having my own personal studio was a real mood boost!
What didn't work
I checked the soundproofing by playing radio on my phone. The difference between inside and outside the Danbocchi was barely noticeable (sigh)
You could also hear the radio program clearly from outside the room.
This was nowhere near the soundproofing level I was hoping for...
How I Felt About the First Round of Danbocchi Modifications
The first round of Danbocchi modifications happened in January 2019.
What follows is a summary of using it up through the second round of modifications, in June that same year.
4 Complaints (Things That Bothered Me) and How I Planned to Fix Them
1. Happy with the audio quality, unhappy with the soundproofing
→ My voice was audible two rooms over, which stressed me out whenever a script had shouting or lines I didn't want overheard.
This clearly needed further modification to improve the soundproofing.
See the second round of modifications for details.
2. The script was hard to read in the dark
→ Two lights weren't enough
→ I tried three lights, but it was still dim, and they kept peeling off and falling, which was stressful.
The dim atmosphere was relaxing, but it was genuinely hard on my eyes.
Fix: switch to white sound-absorbing material
Get an LED desk lamp (one that doesn't make electrical noise)
3. Some of the sound-absorbing material kept peeling off, and the sound of it peeling became noise
※Beyond it actually falling, the little crackling sound as it started to peel bothered me too
Fix: apply it carefully from the start, and don't skimp on adhesive
Switch to different sound-absorbing material
4. Working in a cramped space made me start noticing tiny sounds
Not directly related to the Danbocchi itself, but to cut down noise, I don't keep my PC, audio interface, or headphones inside the booth.
The thing that bothered me most was the sound of my glasses' nose pads... though I guess I could just get glasses without nose pads (lol)
Basically, I started reading a lot of product descriptions and reviews checking [does this make noise?] before buying anything.
So, I'd been hoping to keep costs as low as possible, but...
I learned that recording comfortably in a Danbocchi costs real money.
1, 2, and 3 all seem solvable if you throw money at them.
That said, 1 and 2 are connected — which material you choose changes the outcome for both.
At this point I found myself thinking... should I have used lead sheet instead of the sound-blocking sheet?
Ugh, there's no starting over from scratch now... more than anything, from the very start,
I honestly thought, "I should have just paid extra and bought an already-modified Danbocchi" (my inner voice).
But the odds of finding an already-modified one for sale are low, and there's no guarantee I'd even like someone else's modifications!
So I told myself that, and headed into round two of modifications.
Chapter 3 - How I modified my Danbocchi booth again (second round of modifications)