
In Chapter 1, I talked about why I chose a Danbocchi booth as a simple soundproof room for home recording, to work as an online voice actor.
Chapter 2 - How I modified my used Danbocchi booth (first round of modifications)
In Chapter 2, here's the write-up of the first round of modifications I made to the used Danbocchi booth I bought.
This time, in Chapter 3, it's the story of the second round of Danbocchi modifications.
Key Points for the Second Round of Modifications
Here's what I focused on to fix the complaints I had from the first round.
Filling the four corners and gaps with sound-blocking sheet
After thinking it over, I decided against lead sheet this time — the weight was a dealbreaker.
I peeled off all the sound-absorbing material that was already stuck on and filled the four corners and gaps with sound-blocking sheet.
I also sealed up the ventilation fan area, and told myself, "good enough!"
This should at least somewhat reduce sound leaking from the inside to the outside.
Making the inside of the Danbocchi white or a bright color
The script was hard to see in the first round of modifications, so a bright interior is a must.
If a product has good sound-absorption performance, I'm willing to compromise on color, but black is a no.
I'll go into detail later, but in the end I decided to go white.
Laying cork joint mats down and building the Danbocchi on top of them
I used to have the Danbocchi sitting on a blue tarp, but I switched to cork.
It might just be a placebo for soundproofing... but it also looks nicer and won't leave marks (bought at Nitori for about ¥1,000)
Soundproofing and Sound Absorption: What I Learned, and the Products I Researched
Alright, from here it's the meat of it — soundproofing and sound-absorbing materials.
This was the part I agonized over most in the second round, and the part I had to change the most this time to fix my complaints.
I'm sure a search will turn up plenty of sites about sound blocking, soundproofing, and sound absorption, but here's my own summary of what I looked into.
What "soundproofing" actually means
The word "soundproofing" itself doesn't refer to any one specific method.
It refers to preventing sound from entering a room from outside, and preventing sound made inside a room from leaking out.
To improve soundproofing performance, you need both "sound absorption" and "sound blocking."
In other words, you use various materials and boards to achieve "sound absorption" and "sound blocking," and the combined result is what we call soundproofing.
What sound absorption means
It refers to absorbing sound reflections off walls and ceilings to reduce reverberation.
This both helps prevent sound from passing through to the outside, and reduces the reverb of sounds being made inside the room.
Sound-absorbing material is full of countless tiny holes that draw sound in and scatter it, which is how it absorbs sound.
The higher the sound-absorption rating, the better the material, it seems.
Sound that's been heavily absorbed, with little reverb, is described as having a "dry" tone.
What sound blocking means
It refers to blocking sound that travels through the air, reducing how much sound passes between inside and outside.
Even in an ordinary home, thick sound-blocking (soundproof) curtains are fairly common.
To improve sound-blocking performance, thick, hard, heavy materials like concrete or steel plate seem to work best.
Which means the lead board I gave up on this time because of its weight is actually heavier than, say, plywood — so it would have been more effective!
Sound-absorbing material candidates
SONEX edition (urethane material / every sound-absorbing material has a nice shape that's fun just to look at)
I wanted white sound-absorbing material for the inside of the Danbocchi, but finding white sound-absorbing material turned out to be tough.
While searching for already-modified used Danbocchi booths, I noticed a sound-absorbing material that was commonly used at the time.
That was SONEX.
You can buy it from Sound House.
※Click the image below to go to the product page.
UNX2 BROWN, 8 sheets, 61cm x 122cm, ¥79,800

The price is pretty steep, but I saw a review mentioning it being used in a Danbocchi, so I had high hopes for its performance.
That said, the fact it's not white, on top of the high price, put a temporary stop to my buying urge. (there's also a charcoal gray color option)
Also from SONEX, the VLW35, ¥73,800

This one's white! It's sold in the VLW series with different thickness options.
Someone had used this in their Danbocchi, and it made for a genuinely beautiful, all-white booth.
I was drawn to a review that said it was "easy to work with and 100 times more pleasant to handle than glass wool."
But reading other people's articles and reviews, it seems that while this product may well be good as a sound absorber, it's a different story when it comes to actual soundproofing.
It's such a nice white material, but thinking about soundproofing made me hesitate.
MG board edition (rock wool / cutting to size required)
The site I respect uses MG board. It's white, so it checks all my boxes.
But the reason I couldn't commit to MG board right away... was the reviews for MG board!
I kept seeing reviews saying the rock wool inside MG board is a pain to handle.
100% guaranteed to be itchy
Itchiness confirmed! And for some people it can also cause skin redness or affect the respiratory system. If you have elderly people or kids in the house, handle with care.
My skin isn't exactly tough, and I'm a voice actor — what would I do if it messed up my lungs?! I couldn't bring myself to commit.
You have to cut it to fit the Danbocchi's dimensions. Even in videos I watched, I could see the itchy fibers scattering around. Scary, so scary...
...And yet,
I ended up choosing MG board anyway.
So how did I get over the fear?
Turns out there was a product where the MG board comes fully wrapped in glass cloth on all sides!
By covering both sides with glass cloth, you can cut down on the fiber scattering. Here it is!
"MG board (fully wrapped in GC)" 50mm / 606×910mm, pack of 8 sheets, ¥17,820 (outlet stock)
※Out of stock, so I can't link it...
I figured that with glass cloth wrapped on both sides, the fiber scattering during cutting would be reduced enough to handle, so I made up my mind!!
But then! A call from the shop: "Sorry, this is an old item and we're actually out of stock" — that call came in!!
Right after I'd finally made up my mind, the item was gone. I cried that day.
With no other option, I looked around for other places selling boards fully wrapped in cloth, and I found one!
Soundproofing specialist Pia Living
This is where I buy my bond tape.
At the time I was researching, this was the only place selling MG board fully wrapped in glass cloth.
This site has a ton of information about soundproofing written up. Definitely worth checking out!
MG board's performance also varies with density.
This shop carries boards at 150kg/m3 density too.
I read somewhere that 80kg/m3 or higher is the desirable range for soundproofing.
Rock wool board, density 150kg/m3, glass cloth on both sides / 50mm thick, from ¥8,910

Rock wool board, density 80kg/m3, glass cloth on both sides / 50mm thick, from ¥8,910

...¥4,500 × 8 sheets = ¥36,000 Σ(・ω・ノ)ノ Way over budget!!
Compared to the outlet item I'd first seen, the price was double, and that gave me a bit of a scare.
But then, I found something else here that caught my eye!
Polyester-fiber sound-absorbing material, e-Felt, glass-cloth-framed finish, 50mm thick, set of 6, ¥12,000

+ set of 2, ¥5,200
What's great about this one: even people with sensitive skin can use it, no itching, no fiber scattering, easy to handle, and the price is decent too!
What I couldn't tell was the performance. I decided to just email the shop and ask.
What I Asked the Shop About Sound-Absorbing Material, and Their Answers
<Products I was torn about buying>
Q. I'm torn between MG board and e-Felt
- Regarding the polyester-fiber sound absorber e-Felt — please also tell me about its weight
A. When it comes to safe sound-absorbing materials, we'd suggest anything other than glass cloth or rock wool.
In that case, this product is a good recommendation.
However, e-Felt has a lower density, so its soundproofing effect may be less noticeable compared to rock wool board or glass wool sound absorbers. Weight is 1kg or less per sheet.
Q. For 50mm MG board, is single-sided cloth or fully wrapped cloth better?
A. Among sound absorbers, MG board is relatively high-performing, so we'd recommend it. We'd also recommend using it together with a sound-blocking sheet.
While I was at it, I asked about a bunch of other things too.
<Various worries>
Q. I want to improve sound absorption
A. To improve sound absorption, adding more thickness helps.
Also, layering sound absorbers of different densities to build up thickness widens the range of frequencies you can reduce, so that might be worth considering.
Q. I want to improve soundproofing
A. For soundproofing, the higher the density, thickness, and weight, the better the effect. However, harder materials reflect sound more, so you'll also need to use sound-absorbing material together with the sound-blocking material.
And above all, if you don't install it with as few gaps as possible, sound will leak through those gaps no matter how much soundproofing you've done, so we'd recommend installing it with as few gaps as possible.
Q. Do you think there's any point in attaching sound-blocking sheet to the outside?
A. Rather than attaching sound-blocking sheet to the outside, the most effective method is to alternate sound-absorbing material and sound-blocking sheet, ending up with sound-absorbing material on both outer surfaces.
Q. My house is old, so I don't want to add too much weight. What should I do?
A. If you can't install heavier materials due to concerns about your house's structural durability, you'll have to use lighter materials, but in many cases heavier materials give a better soundproofing effect.
Q. What's the best way to attach the sound-absorbing material?
A. The ideal order for attaching, from outside to inside, would be:
<outside> sound-absorbing board → sound-blocking sheet → your current sound-absorbing material <inside>
but if that's difficult, since you're already going to the trouble, it should be fine to just layer them on top of what you have.
Q. Is it okay to cover cut edges with white duct tape? It seems simpler than wrapping them in cloth.
A. Duct tape should be fine, but it won't stick to the fiber part, so you'll need to wrap it firmly all the way onto the finished cloth surface. The adhesive will degrade over time, so if you're using it long-term, we'd recommend covering it with cloth instead.
Q. Do you have any other recommendations?
A. Since you mentioned MG board and similar products are itchy, if you're open to something other than the above, we also have a soundproof panel called "One-Touch Soundproof Wall," which is already made by attaching high-density glass wool sound absorber and sound-blocking sheet together. This product is basically custom-made and shipped to the size you request, so you won't need to do the troublesome cutting work yourself.
Also, the cloth is finished by layering a second finishing cloth on top of the glass cloth, so you'll barely experience any itchiness at all when using it.
Wow, I really asked a lot of questions.
I swallowed my embarrassment and asked away.
And they really did answer every single one, so thoroughly and carefully.
What became clear from asking was that, as expected, spending more money gets you something safer and higher quality.
So, what's someone like me with a limited budget supposed to do?
The answers to my questions gave me a lot of hints about what to do going forward.
What I needed to satisfy my conditions:
- Keep the price down
- White sound-absorbing material
- Reasonably good soundproofing
And the answer came out.
It has to be MG board!
Someone with no money like me really has no business complaining that the cutting work is a hassle.
The conclusion I reached
I decided on MG board (single-side cloth) + cutting it to fit myself.
① To keep costs down, I'll apply the cloth myself. If I'm worried, I'll double it up.
② I'll cover the cut edges with duct tape right away to stop fiber scattering as early as possible.
I also found out that rock wool isn't easily absorbed into the body, which eased my anxiety about doing the cutting work.
And Finally, Round Two of the Danbocchi Modifications!
[What I prepared]
※The prices are roughly what things cost at the time (treat them as reference prices only).
- MG board, thick, wrapped in GC, B-grade stock (¥12,500)
- Bond tape, 50mm × 2 rolls (¥2,800 each)
- Bond spray × 2 cans (¥1,300 each)
- Wood glue (¥500)
- White duct tape × 2 rolls (¥500 each)
- Cloth (0.6m × 8 sheets) (¥1,500)
- Rubber dish gloves (¥200)
- Mask (already had it)
- Tension rods × 8 (¥100 each)
- Utility knife, scissors, blue tarp (things I'd already used before)
(for the base under the Danbocchi)
- Cork joint mat (¥1,000)
(for inside the Danbocchi)
- Joint mat (¥1,000)
- Fluorescent light (¥2,700)
- Music stand (already had it)
- Dehumidifier × 2 (¥150 each)
※I considered glass cloth for the fabric, but went with regular cloth instead
Placing the MG board inside the Danbocchi once, to sort out which pieces need cutting and which don't
※Be careful at this stage since it scatters itchy fibers. (wear rubber gloves)
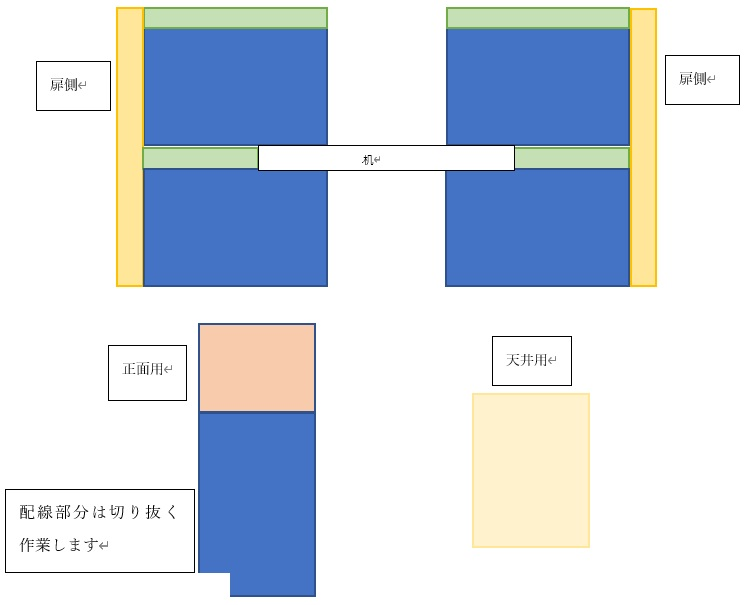
- The MG board gets cut and fitted together like a puzzle. A rough cutting diagram is below.
- The blue-colored pieces are the MG board at its original size. Everything else needs to be cut down.
- The front panel size can be used as-is. The ceiling should theoretically also fit at its original size, but when I tried it once, it didn't fit at all.
- For the ceiling, since I didn't want to cut it if I could avoid it, I stepped on the four corners with my foot to force it in.
- I felt like it would be better to attach sound-blocking sheet to the back,
- but it would get too heavy to lift, or too hard to fit into place, so I skipped attaching sound-blocking sheet there.
- I didn't modify the door — I kept using the sound-absorbing material from before.
※Lay down the cork joint mat before starting this step
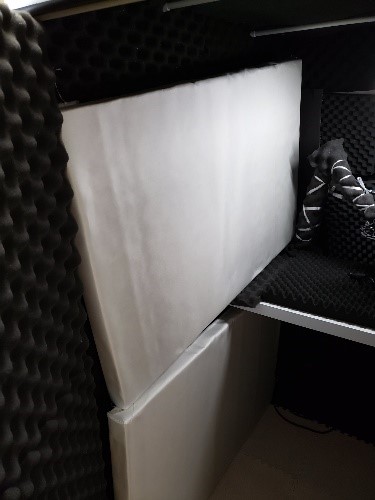
Attaching cloth to the blue-colored MG board pieces that need no cutting (all this work is done outside)
- Lay down a blue tarp to keep things clean.
- Place the board on the blue tarp with the rock wool side facing up.
- Put on rubber gloves and spray the rock wool evenly with bond spray.
- Immediately lay the cloth on top.
- Since I was working alone, I'd spread the cloth out in one go, adjust it a bit, then press it down working from the inside outward. (with two people, you could probably get a cleaner finish)
- Repeat this for all 5 MG board pieces.
※For one MG board piece, cut out the wiring opening and seal the edges with white duct tape
※MG board is weak to moisture, so work on a clear, sunny day
※Bond spray is strong stuff, so be careful about your surroundings when spraying
Attaching sound-blocking sheet to the 5 cloth-covered MG board pieces
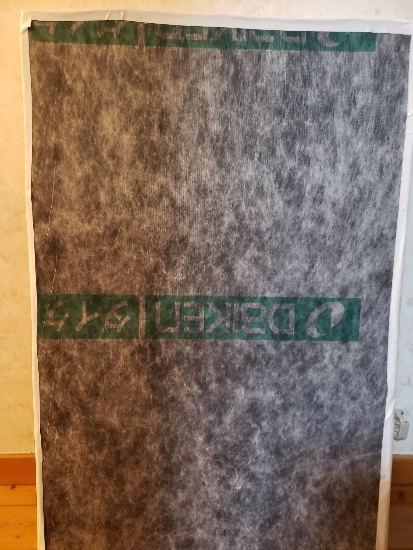
Just like before, I attached this using bond tape.
The sound-blocking sheet is what was left over from before.
If it wasn't enough, I gathered up small scraps and pieced them together.
If you can't get enough for all 5 pieces, decide whether to buy more or just do without.
※With reassembly later in mind, the sound-blocking sheet is a bit smaller than the panel
※Some places sell sound-blocking sheet by the cut length
Measuring the MG board
I placed the 5 sound-blocking-sheet-covered pieces inside the Danbocchi and measured for the remaining board sizes.
Packing everything in tightly with no gaps improves the soundproofing effect, so measure carefully here.
The desk-front panel is hard to fit in place, so just measure it for now.
Cutting after measuring (do the cutting work outside)
※From here on it scatters itchy fibers, so I'd recommend wearing sweats, a mask, and rubber gloves.
- Draw lines with a marker based on your measurements
- Cut along the lines with a utility knife. (it cuts easily / keep cutting without stopping, since it scatters fibers)
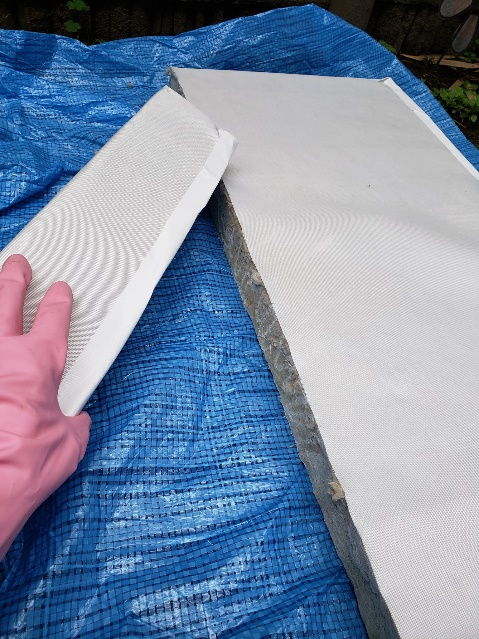
- Once you've finished cutting, cover the cut edges with white duct tape. (using proper cloth tape rather than a cheap one is worth it — it doesn't peel off as easily later)
- As shown in the photo, it's better to let it overlap a bit extra when you apply it.
※If you still have leftover sound-blocking sheet, attach it to the back.
But keep it on the smaller side.
These measured-and-cut boards get squeezed and pressed into place during reassembly, so
if you cover the full width with sound-blocking sheet, it becomes harder to assemble.
Assembling the parts
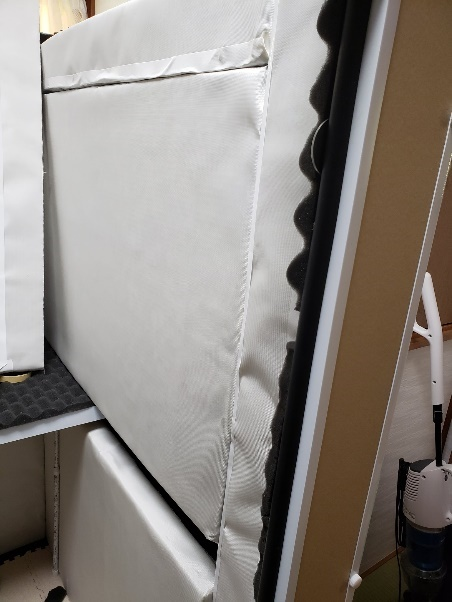
- With the Danbocchi's ceiling panel removed, fit the larger MG board pieces into place.
- Attach the Danbocchi's ceiling panel to complete the base Danbocchi structure itself.
- After that, fit in the remaining MG board pieces one by one.
- If a piece is too big to fit, crush down the rock wool inside it, or peel back the white duct tape once, pull out some of the interior material to adjust it, then fit it in.
- The desk-front panel is really tight. You have to force it into the narrow gap by the desk.
- Finally, fit the MG board ceiling piece in place, secure the MG board with 8 tension rods, and you're done!
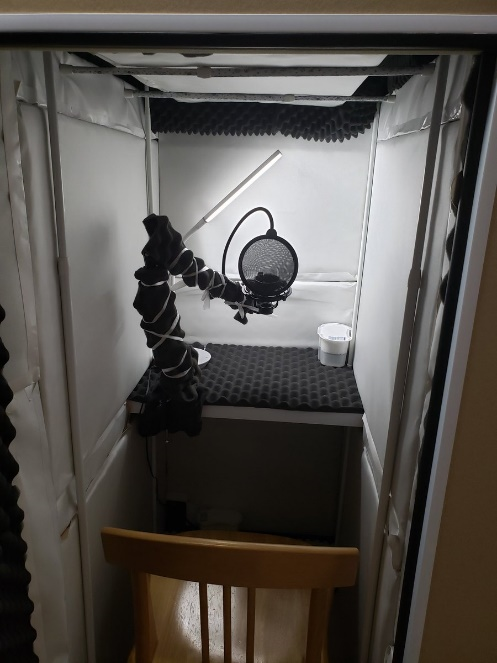
Fitting the MG board into the ceiling and setting up the tension rods was a real struggle to do alone.
I ended up cutting the MG board pieces smaller so I could manage it by myself.
If you made a measuring mistake or end up with a gap, stuff in whatever leftover sound-absorbing material you have.
The joint mat on the floor tends to come loose, so tape it down from the start. It's layered cardboard, sound-absorbing material, then joint mat, in that order.
Tension rod placement: 2 on the ceiling, 2 above the desk, 2 below the desk, and 2 long ones on the door side
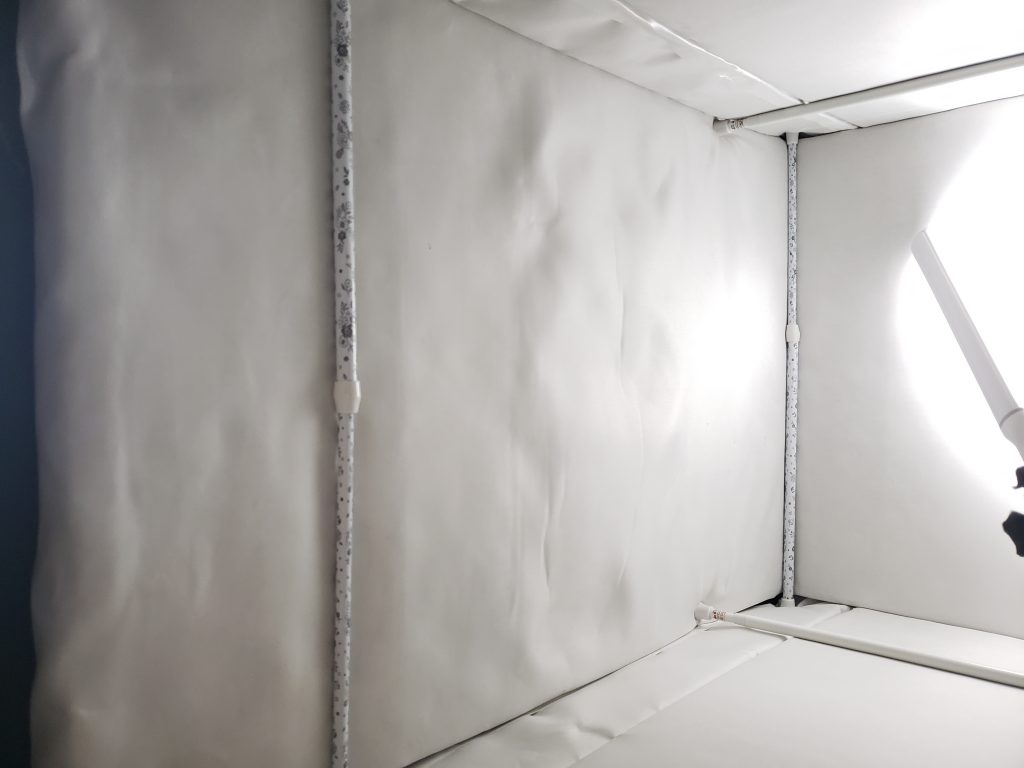
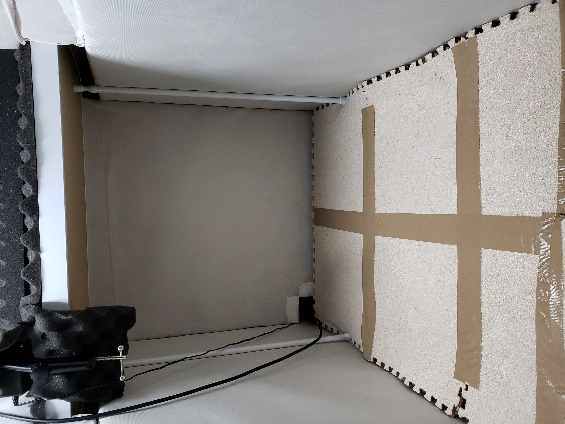
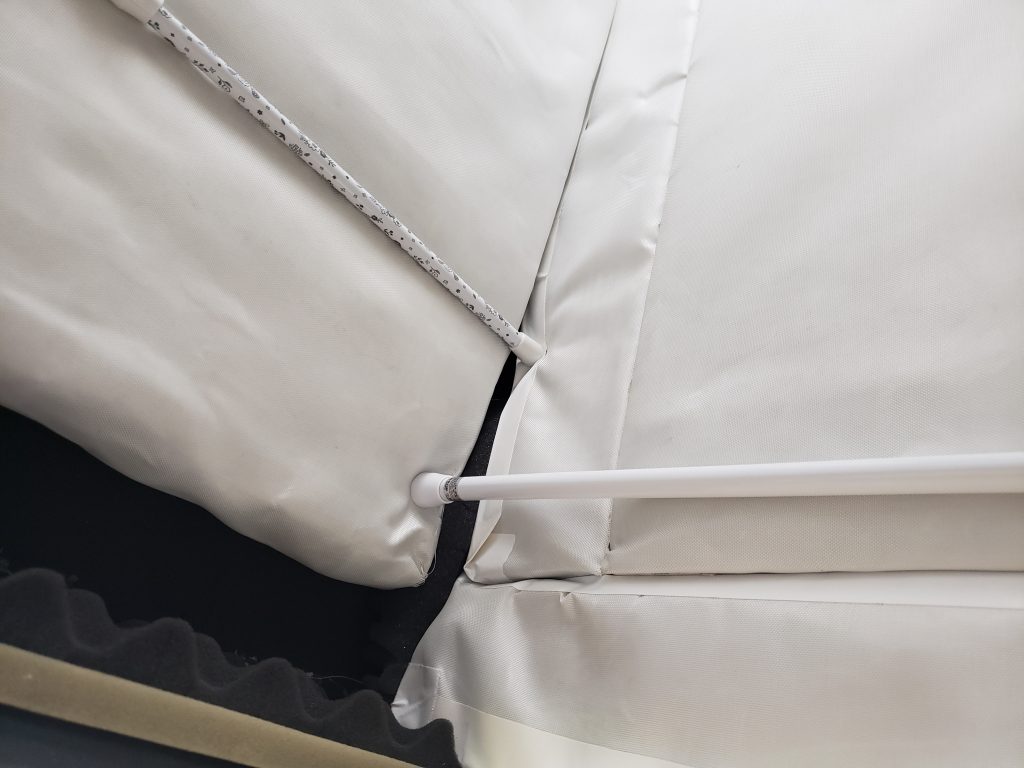
Finally Done!
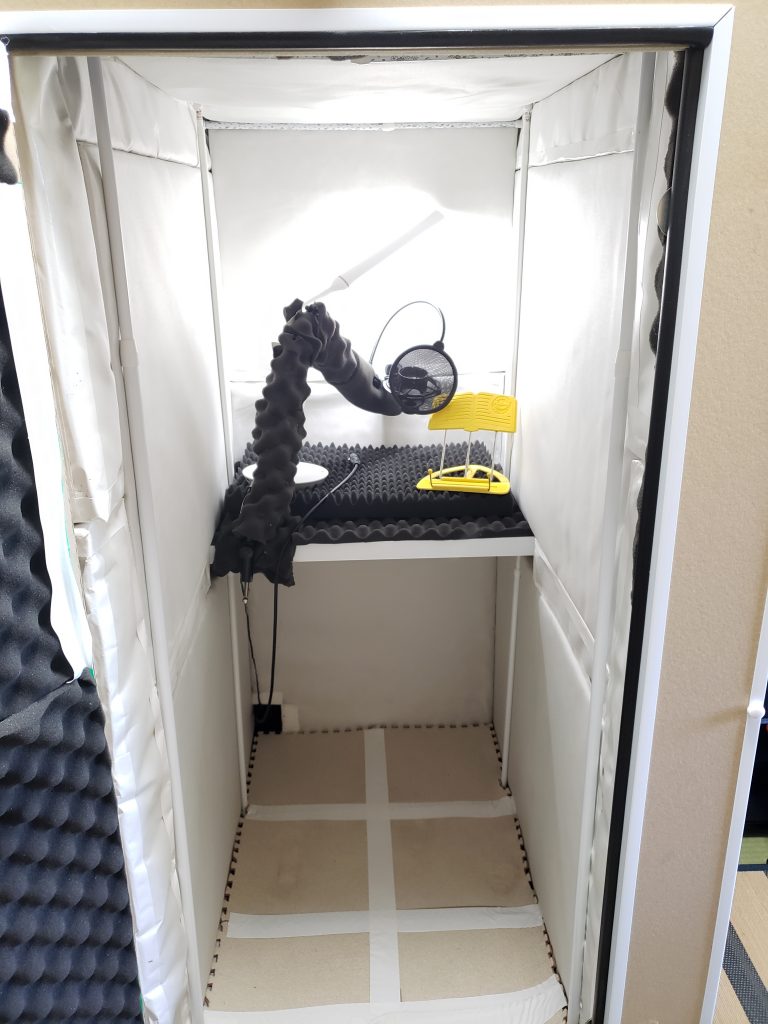
Just set up the music stand and it's complete.
MG board is weak to moisture, so keep at least 2 dehumidifiers in there and check them regularly.
The reason there's sound-absorbing material wrapped around the arm-type mic stand is to prevent resonance.
Without it, you get a sharp metallic ringing sound whenever there's a shouted line.
I had one MG board piece left over, so attaching it to the door side would probably be a good idea.
I tried it, but it felt too cramped, so I gave up on that.
How It's Held Up Since, and a Wrap-Up
It's been 8 months now since the second round of Danbocchi modifications. I'm very happy with how it feels to use.
As I mentioned at the start, if someone's in the same room, they can tell what I'm saying, but from the next room over, they can't make out anything I'm doing at all.
I can even shout loudly and it's fine!
No reverb, and I can record with clear audio quality!
My recording endurance time in the Danbocchi is 5 minutes per session. That's roughly what I can handle before the heat and lack of ventilation get to me.
Summer is genuinely like a steam bath in there. I can't run the AC during recording, so I make sure to cool the room down beforehand.
The inside of the Danbocchi is comfortable in winter, but editing work outside the booth afterward is cold and rough. I turn the heater on before recording.
As for the money side, adding everything up simply comes to a total of ¥110,580. This figure has rounding, and doesn't include shipping or handling fees, so treat it as a bare minimum estimate. I go through a lot of dehumidifier packs, so including consumables, I think it came to around ¥120,000 total. That said, thanks to this I've been able to get work, so I've recovered the cost of the Danbocchi modifications.
Finally, thank you so much for reading through this story of how I got my very own soundproof room.
And my thanks go out to all the soundproofing sites and Danbocchi-modification pioneers out there. Thank you.
I'm not exactly the efficient type in anything I do, so if I'd been smarter about it, I probably could've gotten a better result on both cost and soundproofing performance.
In my case, I think what got me to where I wanted, more than anything, was sheer passion — or maybe obsession — for having a soundproof room.
A Side Note: The Best Time to Find Used Deals Is Moving Season
For this Danbocchi modification project, I basically did all my shopping online.
To get things cheap, I searched auctions and secondhand listings every single day... for many, many days.
Finding high-quality sound-absorbing material or soundproofing gear used is really a matter of timing — if you find it, count yourself lucky.
Apparently used items tend to show up more during moving season.
A related item (a recommended LED desk lamp)
Noise is a real concern with LED desk lamps, so I read through a ton of reviews.
Since this is an electronic device, I bought it new (so I'd have a warranty)
Dimmable LED desk lamp with USB port, white

Bought it from Ohm Electric for ¥2,700.
No noise, and the neck bends so it's convenient, plus the brightness is adjustable in steps — this turned out to be a really good product!
Chapter 2 - How I modified my used Danbocchi booth (first round of modifications)